A Web Developer's Diary

Play 2 Framework on Maven with auto-reloading through IDE

4/27/2015

1 Comment

 
Are you looking for a way to run Play 2 Framework on Maven with its auto-reloading functionality? You've come to the right place, read on.

I've been working with Play2 Framework for several years now and it's a very nice way to develop in Scala. Some of the Play projects have grown rather large and have become sluggish in combination with SBT. Resolving dependencies, compiling and starting Play all take a long time with SBT. Perhaps my biggest objection is that SBT can not stage a self-contained integration-test environment. These shortcomings have forced me to look at SBT alternatives. I arrived at a way to build and run Play projects with support for auto-reloading using Maven, play2-maven-plugin, sbt-compiler-maven-plugin, Eclipse, DCEVM and Zinc. This article describes how to set up such an environment for your own enjoyment.

Start by downloading the following tools:
  • Java SE Development Kit 7u51 - needs registration at Oracle (which is unfortunate but free)
  • DCEVM (full) for Java 7u51 (build 3) - make sure to get the full version and not the light version
  • Scala IDE for Eclipse - I used version Scala IDE 4.0.0 and Eclipse 4.4 Luna
  • Zinc latest version - I used Zinc 0.3.7
  • Apache Maven latest version - I used Maven 3.2.3

Which version of Scala IDE, Eclipse, Zinc or Maven you install should not matter much. However, the Java and DCEVM versions do matter. It is paramount that the build versions of both Java and DCEVM (in this case 7u51) match perfectly and that you get a full version of DCEVM.
Next we are going to patch Java with DCEVM full version. Run the DCEVM installer as root after downloading it by executing the following command from a terminal:
$ sudo java -jar installer-full-jdk7u51.3.jar
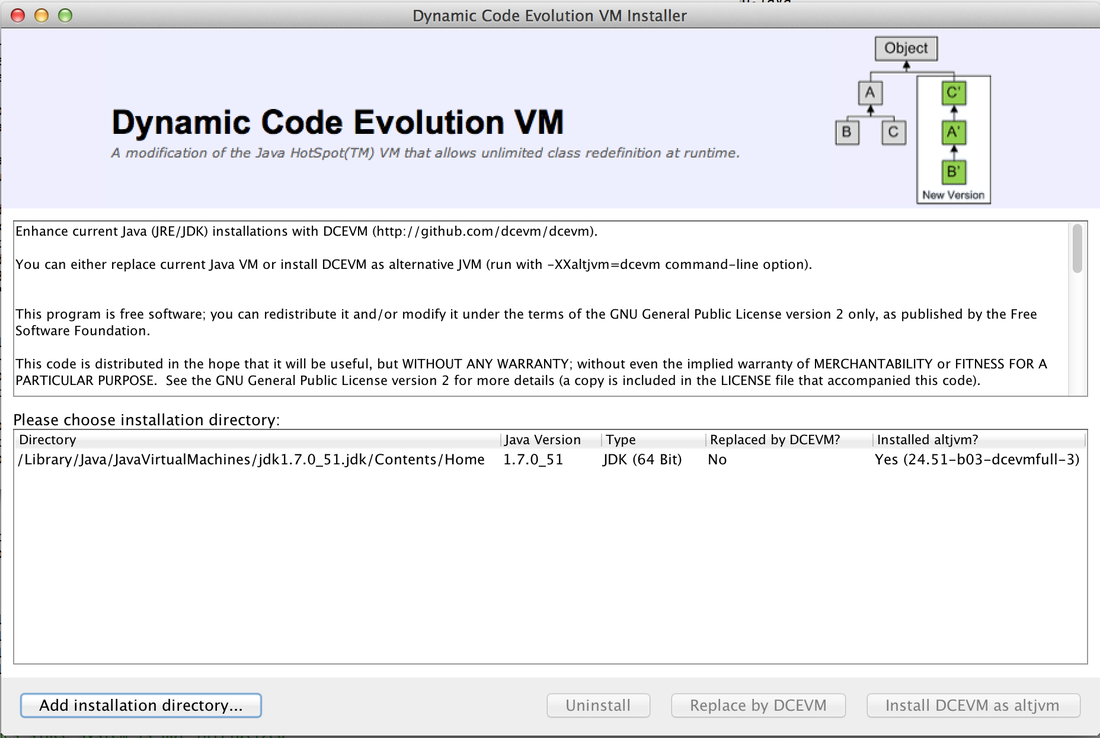
This will open a GUI which asks you to specify the Java home directory for Java 7u51. If it's not already there, click the "Add installation directory..." and browse to the right Java home directory (look this up for your own operating system, this may be different). Then select the right Directory for Java version 1.7.0_51 and click "Install DCEVM as altjvm".
Picture
Apache Maven, Scala IDE and Zinc are all available to download as binaries. Download and extract the binary the respective binary archives and you should be good to go. Special note on running Maven: you have to set the JAVA_HOME environment variable. This is explained on the Maven download page (scroll down) for each operating system. The JAVA_HOME environment variable should be set to the same path you selected in the DCEVM GUI.

Make sure that Java 7u51 is your default Java version. You can verify this by running `java -version` from the command line. Also make sure DCEVM is correctly patched into the JVM as an alternative JVM, which can be verified by running `java -XXaltjvm=dcevm -version`, which should show something like:
$ java -version
java version "1.7.0_51"
Java(TM) SE Runtime Environment (build 1.7.0_51-b13)
Java HotSpot(TM) 64-Bit Server VM (build 24.51-b03, mixed mode)
$ java -XXaltjvm=dcevm -version
java version "1.7.0_51"
Java(TM) SE Runtime Environment (build 1.7.0_51-b13)
Dynamic Code Evolution 64-Bit Server VM (build 24.51-b03-dcevmfull-3, mixed mode)
Start Zinc by going to the extracted Zinc directory and running:
$ ./bin/zinc -start
Nailgun server running with 0 cached compilers

Version = 0.3.7

Zinc compiler cache limit = 5
Resident scalac cache limit = 0
Analysis cache limit = 5
Start up the Scala IDE (run the file called `eclipse` in the extracted directory) and import this example Play2 Maven Hotreload project into Eclipse. Then enable the "eclipse" build profile by right-clicking on the "play2-maven-hotreload" project and go to Maven > Select Maven Profiles. Make sure only "eclipse" is checked and click OK. Right click the project again and go to Configure > Add Scala nature. The eclipse project is now set up correctly.
Note: at the time of writing the current play2-maven-plugin release does not have Dev mode support yet and as a result the static resources are cached by the browser in Prod mode. Grab this modified version of the play2-maven-plugin to build a snapshot that supports Play in Dev mode.
$ git clone https://github.com/webdevelopersdiary/play2-maven-plugin
$ cd play2-maven-plugin/plugin
$ mvn compile install
Go back to the play2-maven-hotreload directory on the command line and run:
$ mvn -P hotreload compile play2:run
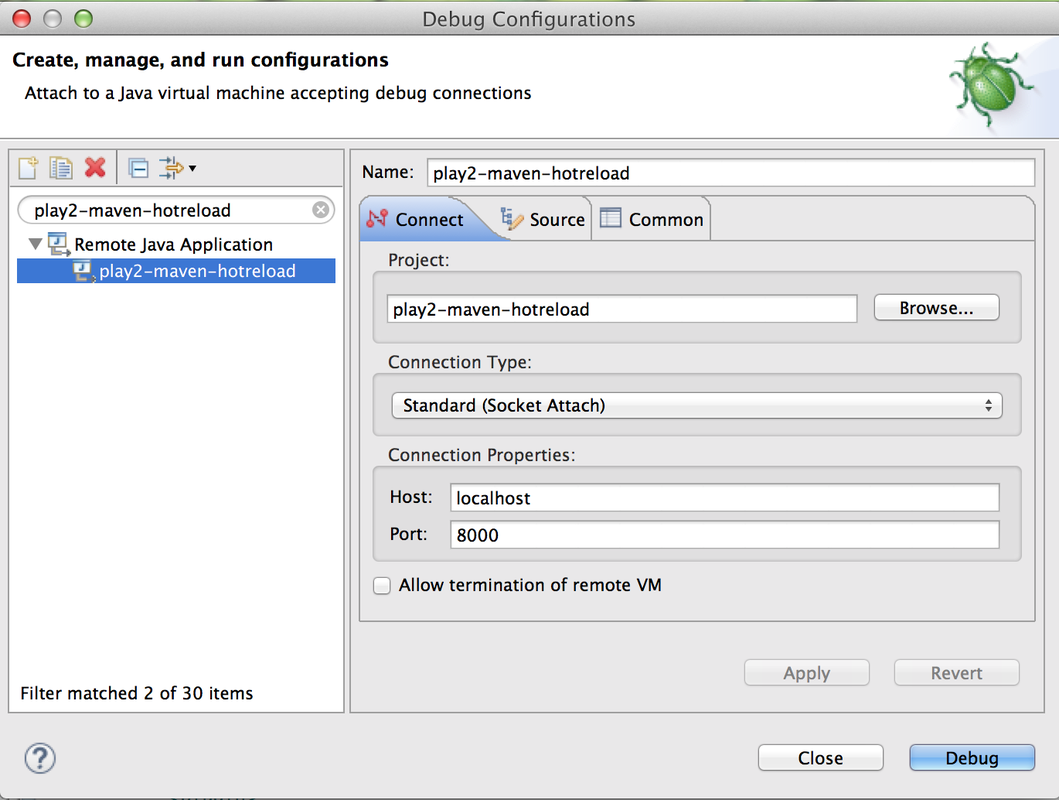
Wait until you see that Play has started (in Dev mode) and then start a remote debugging session in Eclipse with the following debug configuration:
Picture
Go to http://localhost:9000 and take a look at the page. Now edit app/controllers/Application.scala or public/javascripts/hello.js and wait for Eclipse to finish compiling. The first compile attempt might take a few seconds, subsequent compile runs should be within one or two seconds thanks to Zinc. Refresh the page. If all went alright, the changes should be visible without restarting! As an added benefit, the Play server was not reloaded internally like in SBT. This gives you an extra speed boost, which is significant for large Play apps that rely on multiple database connections and cache servers, for example.

I imagine this will also work with other IDEs that have hotswapping support, like Netbrains IntelliJ IDEA, but I have not tried others so far. If you have tried, please drop your experience in the comments below. Grzegorz Slowikowski, the author of play2-maven-plugin, has brought to my attention that LinkedIn is planning to bring hot-reload support for Play 2 to Gradle. Somewhere in the future the play2-maven-plugin will support hot-reloading natively as well, until that time it will remain in beta. Simpler and more portable alternatives to SBT are on the way, stay tuned. Thanks for reading.
1 Comment

OpenCL on Ubuntu 12.10 with Intel CPU

5/4/2013

5 Comments

 
If you are trying to get some test scripts running on Ubuntu 12.10 and you can't get the Intel SDK to work, here's a handy tip. Go over to the AMD website and download their AMD APP SDK. As long as your CPU supports SSE, the AMD SDK will provide you with OpenCL capabilities on any processor.
I was having trouble getting Intel's SDK to work, as well as their open source variant Beignet. Both versions did not reckognize any OpenCL platforms or devices. I am on a Intel Core I5 CPU with Intel HD Graphics 4000 (it's a shame I can't use that on Ubuntu yet, though I am happy to be running sample code now :-)).
For your convenience, here are the steps to download and install OpenCL on Ubuntu:

First, download the SDK. At the time of writing, the newest version is version 2.8.1.0. For 32 bit platforms:
http://developer.amd.com/wordpress/media/files/AMD-APP-SDK-v2.8.1.0-lnx32.tgz
Or for 64 bit platforms:
http://developer.amd.com/wordpress/media/files/AMD-APP-SDK-v2.8.1.0-lnx64.tgz
Extract the file you just downloaded and run the installer:
$ tar -xzvf AMD-APP-SDK-v2.8*-lnx*.tgz
$ sudo ./Install-AMD-APP.sh
As a final step reboot your computer and then you should be able to run OpenCL applications on Ubuntu.
Update August 19th, 2013: updated AMD APP SDK download links from version 2.8 to version 2.8.1.0 and updated recommended download method, thanks to Jacek for pointing that out!
5 Comments

How to stop Magento's emails from bouncing

1/21/2013

1 Comment

 
Recently I noticed some emails sent by Magento keep bouncing back. The mail server dropped me a few "Undelivered Mail Returned to Sender" messages. This is very undesirable, since this means that some order confirmations and/or invoices are not being delivered to the customer. After some investigation I discovered a Magento setting under System > Configuration > Advanced > System > Mail Sending Settings > "Set Return-Path". Set this value to "Yes" to make the Return-Path the same as the sender. Alternatively, you can set it to "Specified" and specify a "Return-Path Email" where all bounced emails get sent to. This can come in handy if you want to have those emails checked with priority for example, you could sent bounced mails to a priority mailbox instead.

Not specifying a Return-Path in Magento (ie. setting "Set Return-Path" to "No") will most likely get your emails blocked by a lot of spam filters.
1 Comment

MySQL database replication using SSL on Ubuntu 12.04

7/15/2012

3 Comments

 
This tutorial describes how to set up database replication for MySQL using SSL on Ubuntu 12.04. There are some tutorials out there, but I found out they are a little outdated and don't work as well any more (at least not for Ubuntu specifically). So I decided to write down my experience for other developers who find them selves setting up MySQL database replication to make their lives easier.

First, we start with setting up the master server. Last, we set up the slave server to download database changes from the master server. For the purpose of this tutorial we are going to replicate a database called 'exampledb' from a server at master.webdevelopersdiary.com to a server at slave.webdevelopersdiary.com.

Set up the master server

Setting up the master consists of the following steps:
  1. Generate SSL certificates.
  2. Edit MySQL configuration my.cnf.
  3. Restart MySQL server process.
  4. Set up database replication privileges (and force SSL).
  5. Perform initial database backup to start replication from.
  6. Finish up.
The SSL certificates have to be placed in the /etc/mysql/ directory if you want them to work out-of-the-box. If you want to place them elsewhere, you first have to update the MySQL Apparmor settings, or SSL will fail. For the purpose of this tutorial, we will assume all the certificates will be in /etc/mysql/. The MySQL Manual explains very well how to generate the SSL certificates. I copied the steps here for your convenience. First, we generate the CA certificate:
 $ mkdir ~/mysql-tutorial/ && cd ~/mysql-tutorial/
$ openssl genrsa 2048 > ca-key.pem
$ openssl req -new -x509 -nodes -days 1000 \
-key ca-key.pem -out ca-cert.pem
Then create the server certificate, remove its passphrase and sign it:
 $ openssl req -newkey rsa:2048 -days 1000 \
-nodes -keyout server-key.pem -out server-req.pem
$ openssl rsa -in server-key.pem -out server-key.pem
$ openssl x509 -req -in server-req.pem -days 1000 \
-CA ca-cert.pem -CAkey ca-key.pem -set_serial 01 -out server-cert.pem
Create the client certificate, remove its passphrase and sign it:
 $ openssl req -newkey rsa:2048 -days 1000 \
  -nodes -keyout client-key.pem -out client-req.pem
$ openssl rsa -in client-key.pem -out client-key.pem
$ openssl x509 -req -in client-req.pem -days 1000 \
  -CA ca-cert.pem -CAkey ca-key.pem -set_serial 01 -out client-cert.pem
Install the certificates into to /etc/mysql/ directory:
$ sudo cp *.pem /etc/mysql/
Open /etc/mysql/my.cnf and make sure MySQL is listening on all interfaces so that the backup server can reach the database from the outside. Typically, there is a line like:
# Instead of skip-networking the default is now to listen only on
# localhost which is more compatible and is not less secure.
#bind-address = 127.0.0.1
The line starting with “bind-address” should be commented out if present.
Also add the following in the [mysqld] section of the config file:
# The following can be used as easy to replay backup logs or for replication.
# note: if you are setting up a replication slave, see README.Debian about
# other settings you may need to change.
server-id = 1
log_bin = /var/log/mysql/mysql-bin.log
expire_logs_days = 10
max_binlog_size = 100M
binlog_do_db = exampledb
And enable SSL by editing:
# For generating SSL certificates I recommend the OpenSSL GUI "tinyca".
ssl-ca=/etc/mysql/ca-cert.pem
ssl-cert=/etc/mysql/server-cert.pem
ssl-key=/etc/mysql/server-key.pem
Close /etc/mysql/my.cnf and restart MySQL to apply changes to the config by executing the command:
$ sudo service mysql restart
Next, we create a database dump of the database we want to replicate (exampledb). During the dump, we need to lock the database to determine the exact position from which we need to start replicating (corresponding to the database dump). So we write down the log ‘position’ column from which to start replicating on the slave.

Login to the mysql server (located at master.webdevelopersdiary.com) as root from command line (or use a web-based admin tool like phpMyAdmin to execute the required commands):
$ mysql -h localhost -u root -p
Execute the following SQL commands:
GRANT REPLICATION SLAVE ON *.*
TO 'slave_user'@'slave.webdevelopersdiary.com'
IDENTIFIED BY 'slave_password'
REQUIRE SSL;
FLUSH PRIVILEGES;
USE exampledb;
FLUSH TABLES WITH READ LOCK;
SHOW MASTER STATUS;
Write down the output of the last statement, you're going to need it later. An example output looks like:
+------------------+----------+-----------------+------------------+
| File | Position | Binlog_Do_DB | Binlog_Ignore_DB |
+------------------+----------+-----------------+------------------+
| mysql-bin.000002 | 1337 | exampledb | |
+------------------+----------+-----------------+------------------+
1 row in set (0.00 sec)
Write down the output. Bring the MySQL console to the background (press CTRL+Z) and make the database dump:
$ mysqldump -h localhost -u root -p --opt exampledb > ~/mysql-tutorial/exampledb.sql
$ fg
`fg` returns you to the MySQL shell, execute the following SQL to finish up:
UNLOCK TABLES;
quit;
Copy exampledb.sql, ca-cert.pem, client-cert.pem and client-key.pem from the ~/mysql-tutorial/ directory to the slave server located at slave.webdevelopersdiary.com. Convince yourself there is no firewall running that is blocking SQL connections from the outside. That's it for the master server.

Set up the slave server

The steps for the slave server are:
  1. Setup the SSL certificates.
  2. Edit MySQL server configuration my.cnf.
  3. Restart MySQL server.
  4. Configure and start slave server.
  5. Finish up.

Place all the .pem files you copied from master server into the directory /etc/mysql/ on the slave server. Start of your favourite editor and edit /etc/mysql/my.cnf and add the following lines:
server-id=2
replicate-do-db=exampledb
Save and close /etc/mysql/my.cnf and restart the MySQL server. Then start up the MySQL console:
$ sudo service mysql restart
$ mysql -h localhost -u root -p
Execute following SQL to import database and start slave. Make sure you replace the correct values at MASTER_HOST, MASTER_USER, MASTER_PASSWORD, MASTER_LOG_FILE (from earlier written down value) and MASTER_LOG_POS (also from earlier written down value).
STOP SLAVE;
CREATE DATABASE IF NOT EXISTS exampledb;
USE exampledb;
SOURCE /path/to/exampledb.sql;

CHANGE MASTER TO
MASTER_HOST='master.webdevelopersdiary.com',
MASTER_USER='slave_user',
MASTER_PASSWORD='slave_password',
MASTER_CONNECT_RETRY=60,
MASTER_LOG_FILE='mysql-bin.000002',
MASTER_LOG_POS=1337,
MASTER_SSL=1,
MASTER_SSL_CA='/etc/mysql/ca-cert.pem',
MASTER_SSL_CERT='/etc/mysql/client-cert.pem',
MASTER_SSL_KEY='/etc/mysql/client-key.pem';
START SLAVE;
SHOW SLAVE STATUS \G;
That's it, database replication should be up and running!
3 Comments

How to build the Quercus WAR file yourself and install it in your local Maven repository

7/8/2012

0 Comments

 
If you ever need to compile Quercus from source and install it into your local Maven repository, this post is just for you. You need to have Subversion (or Git), Maven and Ant installed. Here are the steps:
 svn co svn://svn.caucho.com/home/svn/svnroot/resin/trunk resin
cd resin
ant quercus.war
mvn install:install-file -Dfile=dist/quercus-4_0-snap.war -DgroupId=com.caucho -DartifactId=quercus -Dversion=4.0-SNAPSHOT -Dpackaging=war
Some time ago I had to download the Resin/Quercus source from an unofficial mirror repository on github, because the official Caucho SVN repository located at svn.caucho.com was down. This mirror repository is still available, but at the time of writing it seems a little outdated. If you are interested, perform these steps instead:
 git clone https://github.com/mdaniel/svn-caucho-com-resin.git
cd svn-caucho-com-resin
ant quercus.war
mvn install:install-file -Dfile=dist/quercus-4_0-snap.war -DgroupId=com.caucho -DartifactId=quercus -Dversion=4.0-SNAPSHOT -Dpackaging=war
The Quercus webapp is now installed in your local Maven repository as version 4.0-SNAPSHOT. Include in your project's pom.xml as follows:
<project>
...
<dependencies>
...
<dependency>
<groupId>com.caucho</groupId>
<artifactId>quercus</artifactId>
<version>4.0-SNAPSHOT</version>
<type>war</type>
</dependency>
...
</dependencies>
...
</project>
If you would like to see the other build targets for Resin/Quercus, execute the following command:
ant -p
Bonus tip: you can always find a recent version of the Quercus WAR file at http://www.caucho.com/download/quercus-4.0.x.war, replacing 'x' with the latest version, e.g. http://www.caucho.com/download/quercus-4.0.28.war. You can find the latest version number by looking at Caucho Resin's version number on the website's download page. I figured this out once by guessing URLs to download the latest version. The Quercus website is not updated frequently enough to keep up with newer releases, but the files are actually there.
0 Comments

How to build H2 database engine yourself and install it in your local Maven repository

7/8/2012

0 Comments

 
If you ever find the need to compile H2 database yourself to install it in your local Maven repository, here are the steps:
 svn checkout http://h2database.googlecode.com/svn/trunk/ h2database-read-only
cd h2database-read-only/h2
./build.sh mavenInstallLocal
Your custom H2 build is now installed in your local Maven repository as version 1.0-SNAPSHOT. Include it as a dependency in your project by adding the appropriate XML to your pom.xml:
<project>
...
<dependencies>
...
<dependency>
<groupId>com.h2database</groupId>
<artifactId>h2</artifactId>
<version>1.0-SNAPSHOT</version>
</dependency>
...
</dependencies>
...
</project>
I had to do these steps in order to test a fix I am preparing for H2 to solve the "SET NAMES" syntax error in MySQL compatibility mode when connecting to H2 using the Quercus PHP MySQL driver.
0 Comments

Lightweight self-contained database: SQLite vs. H2 database vs. MySQL embedded

7/8/2012

1 Comment

 
SQLite is a popular choice for PHP programmers to kick-start their development. It's easy, self-contained, requires no configuration, no server and all the data is kept neatly in just one file. Then later on, the application is commonly migrated to a production DBMS (e.g. MySQL). There have not been any alternatives for SQLite when developing in PHP with MySQL as a target platform. But then again, why would you want an alternative for SQLite? Well, to name a few reasons: MySQL compatibility and support for hash indices. And that's not all! Keep reading to see why.

When looking for alternatives to SQLite, I came across two suitable candidates: H2 database engine and a MySQL embedded version. My criteria were that the alternative should be as easy to use as SQLite and compatible with MySQL, based on two reasons. First, I wanted it to be compatible with MySQL so that I can keep using that easy self-contained database for development even after the application has gone into production. Second, an easy to setup database is great for bringing new developers up to speed with development as fast as possible.

Let's start with the good stuff. Below is a comparison of SQLite, H2 database engine and MySQL embedded version.
Comparison of self-contained PHP development databases.
Compare SQLite H2 database engine MySQL Embedded
Footprint 350KiB ~1MB <2MB
License Public domain Dual: Modified MPL 1.1 / EPL 1.0 (commercial friendly) GPL 2.0 (only commercial friendly if not redistributed)
Self-contained ✔ ✔ ✔
Single file ✔ ✔ ✖
Serverless ✔ ✔ ✖
Server-mode ✖ ✔ ✔
Zero-configuration ✔ ✔ ✔
Transactions ✔ ✔ ✔
Indices ✔ (B-tree, R-tree, full-text) ✔ (B-tree, tree, hash, full-text) ✔ (B-tree, R-tree, hash, full-text)
MySQL compatibility ✖ ✔ (but not 100%) ✔
Compatibility with other DBMS ✖ ✔ MySQL, PostgreSQL, Oracle, MSSQL, DB2, HSQLDB and Derby ✖
Encryption ✖ ✔ ✖
In-memory databases ✔ ✔ ✔ (MEMORY storage engine)
To me it looks like H2 database is the easiest to manage. It requires no server and everything is put neatly in one file, which makes back-upping and sharing databases among developers easier. It even has a nice extra feature over MySQL: encryption of data files (though I don't see a direct need for that during development for me personally).

I have experimented with PHP and H2 before and ran into some limitations (Quercus' MySQL driver doesn't play well yet with H2's MySQL compatibility mode so I have to use the Quercus' PDO driver instead). I haven't tried embedding MySQL yet, which is what I am going to try next.

The embedded version of MySQL has the big benefit of being 100% MySQL compatible, but it also has an uncertainty. I am not sure if it's okay to redistribute my application (containing embedded MySQL) among developers. Another limitation could be that I would have to buy a commercial license for MySQL should I choose to distribute embedded MySQL to customers (vs. customers setting up their own MySQL server). Though, it is okay to use MySQL embedded version for a website hosted by myself (it's not technically distributed in that case).

For now, I have not decided yet whether I will stick with H2 or switch to the embedded version of MySQL. I am going to give both a try and I will keep you updated via this blog!
1 Comment

Run Code Igniter on H2 database engine using PDO and Quercus

7/6/2012

4 Comments

 
In my previous post I explained how to setup PHP and H2 database engine using a platform-independent Java stack, a.k.a. JAMP. I managed to get the Code Igniter framework running on JAMP, with some tweaking of the Code Igniter PDO driver. Here are the steps to make it work.
If you would like to skip these steps and jump immediately into some coding action, download the demo.
(Unzip and go into directory jamp-ci-demo/, then type `mvn jetty:run` from the command line. You need Maven installed to execute this command.)
jamp-ci-demo.zip
File Size: 2341 kb
File Type: zip
Download File

First, checkout a copy of JAMP at github (git clone https://github.com/webdevelopersdiary/jamp.git).

Then download Code Igniter and put in the web root (src/main/webapp/).

Because Code Igniter likes pretty urls (ie. /controller_name/method_name) I added support for mod_rewrite to JAMP. It can parse mod_rewrite rules which are located in .htaccess directly in the web root (src/main/webapp/). Add src/main/webbapp/.htaccess with mod_rewrite rules:
<IfModule mod_rewrite.c>
RewriteEngine On

RewriteCond %{REQUEST_URI} ^(system|application).*
RewriteRule ^(.*)$ /index.php?/$1 [L]

RewriteCond %{REQUEST_FILENAME} !-f
RewriteCond %{REQUEST_FILENAME} !-d
RewriteRule ^(.*)$ index.php?/$1 [L]
</IfModule>

<IfModule !mod_rewrite.c>
ErrorDocument 404 /index.php
</IfModule>
Start up the JAMP web server (make sure .htaccess exists before starting the web server or it will have trouble discovering it, then execute mvn jetty:run). Verify Code Igniter is running correctly by going to http://localhost:8080/welcome (the default controller).

If you see a pesky error '$assign_to_config is an undefined variable', go to src/main/webapp/index.php and add
$assign_to_config = array();
under the section 'CUSTOM CONFIG VALUES' (line 110 of index.php) and that should get rid of the error.

Next we configure Code Igniter to connect to the H2 database using PDO. Edit the configuration located at src/main/webapp/application/config/database.php and set these settings:
$db['default']['hostname'] = 'mysql:';
$db['default']['dbdriver'] = 'pdo';
Next, we have to make a slight modification to Code Igniter's PDO driver. Change the method num_rows() from src/main/webapp/system/database/drivers/pdo/pdo_result.php to:

	/**
* Number of rows in the result set
*
* @access public
* @return integer
*/
function num_rows()
{
$sql = $this->result_id->queryString;
if(NULL === $sql) {
$sql = print_r($this->result_id, TRUE);
$quercus_preg = '/\Aresource\(PDOStatement\[(.*)\]\)\z/is';
$php_preg = '/\APDOStatement Object\s*\(.*=>\s*(.*)\)\s*\z/is';
if(preg_match($quercus_preg, $sql)) {
// We're running in Quercus
$sql = preg_replace($quercus_preg, '\1', $sql);
} else if(preg_match($php_preg, $sql)) {
// We're running in PHP
$sql = trim(preg_replace($php_preg, '\1', $sql));
} else {
// No clue about what is running this script!
$sql = NULL;
}
}
if (is_numeric(stripos($sql, 'SELECT')))
{
$count = count($this->result_id->fetchAll());
$this->result_id->execute();
return $count;
}
else
{
return $this->result_id->rowCount();
}
}
Everything should now be in place to connect to the H2 database using Code Igniter's ActiveRecord library. Let's test it! Create a test controller application/controller/test.php:
<?php

class Test extends CI_Controller {
public function index() {
$this->load->database();
$sql = $this->db->query('CREATE TABLE IF NOT EXISTS test (value DATETIME)');
$sql = $this->db->set('value', 'NOW()', FALSE)->insert('test');
var_dump($this->db->get('test')->result());
}
}
Voila! Go to http://localhost:8080/test and enjoy a working Code Igniter on H2 database using ActiveRecord :-)

Note: I used Code Igniter version 2.1.2, Quercus version 4.0.28 and H2 database version 1.3.167.
4 Comments

JAMP: an ultra portable PHP, web server and database stack in Java

7/5/2012

5 Comments

 
Recently I was experimenting with running PHP and the H2 database engine in a Java web server using Caucho Quercus (or just Quercus for short). In theory this would yield an ultra portable platform-independent PHP, web server and database stack. I eventually got it working, but with some limitations. Before I get into details, here are some quick notes: Quercus is a 100% Java implementation of PHP5, though it doesn't support 100% of PHP5's functionality, unfortunately. Also, Quercus' implementation seems to differ from PHP5's implementation sometimes. That said, I thought I would give it a shot anyway, because some popular CMS systems have had success running with Quercus, such as Drupal and Wordpress. I used Jetty as my Java web server (a.k.a. Java web container) and Maven for dependency management. The source code of my experiment is available at github.

This tutorial describes how to set up the PHP and database stack in the Jetty web server. First we set up a web application (webapp for short) in Java which can interpret .php files using Quercus. Then we setup the H2 database engine. Last, we setup the part where PHP can connect to H2 while actually thinking it is MySQL that it's connecting to (using H2's MySQL compatibility mode, because PHP does not have support for H2). Here we go!

Ultra short walk-through
  1. Make sure you have Maven installed.
  2. Download latest version of Quercus (scroll down, get the WAR file).
  3. Go to the directory where you downloaded Quercus and install it in your local maven repository by running the Maven command (e.g. for Quercus version 4.0.25):
    $ mvn install:install-file -Dfile=quercus-4.0.25.war -DgroupId=com.caucho -DartifactId=quercus -Dversion=4.0.25 -Dpackaging=war
  4. Checkout git repository:
    $ git clone https://github.com/webdevelopersdiary/jamp.git
    $ cd jamp
  5. Run web server:
    $ mvn jetty:run
  6. Wait until you see "[INFO] Started Jetty Server" in the console output and point your browser to http://localhost:8080/
  7. The document root is located in src/main/webapp/
  8. Connect to the database in your code using "$pdo = new PDO('mysql:');", mysql_connect() doesn't work due to a driver incompatibility, for more information on this keep on reading.

The long version
Setting up Quercus is quite straight-forward. Download the WAR file of the latest version of Quercus (in my case 4.0.25) and install it in your local Maven repository by running this command from the same location as where you downloaded quercus-4.0.25.war:
 mvn install:install-file -Dfile=quercus-4.0.25.war -DgroupId=com.caucho -DartifactId=quercus -Dversion=4.0.25 -Dpackaging=war 
Then include the following dependency to your Maven project's pom.xml and Quercus should be integrated in your webapp:
<project>
...
<dependencies>
...
<dependency>
<groupId>com.caucho</groupId>
<artifactId>quercus</artifactId>
<version>4.0.25</version>
<type>war</type>
</dependency>
...
</dependencies>
...
</project>
The next step is to be able to run the webapp locally, so that's what we use Jetty for. Add this to your pom.xml:
<project>
...
<build>
<plugins>
<plugin>
<groupId>org.mortbay.jetty</groupId>
<artifactId>jetty-maven-plugin</artifactId>
</plugin>
</plugins>
<pluginManagement>
<plugins>
<plugin>
<groupId>org.mortbay.jetty</groupId>
<artifactId>jetty-maven-plugin</artifactId>
<version>8.1.4.v20120524</version>
<configuration>
<scanIntervalSeconds>1</scanIntervalSeconds>
<stopKey>foo</stopKey>
<stopPort>9999</stopPort>
</configuration>
</plugin>
</plugins>
</pluginManagement>
</build>
...
</project>
Now Jetty and Quercus should be okay to go. You can verify this by putting a phpinfo.php file with the famous code snippet "<?php phpinfo(); ?>" at src/main/webapp/phpinfo.php (relative to pom.xml's location, create directories if they don't exist) and start up the Jetty webserver:
 echo '<?php phpinfo();' > src/main/webapp/phpinfo.php
mvn jetty:run
Wait for Jetty to be completely started (console output should say something like "[INFO] Started Jetty Server") and point your browser to http://localhost:8080/phpinfo.php and verify that Jetty is running and Quercus is installed. (You can stop Jetty by pressing CTRL-C in the console.)

Congratulations! If you made it this far, you have successfully setup a Java web server that can interpret PHP files! But, we're not there yet, we still have to add database support.
We will run the H2 database engine in embedded mode. To do this, we need to include the H2 dependency in the pom.xml. For the integration of H2 and PHP another dependency is required as well: database connection pooling (DBCP), so add both to your pom.xml:
<project>
...
<dependencies>
...
<dependency>
<groupId>com.h2database</groupId>
<artifactId>h2</artifactId>
<version>1.3.167</version>
</dependency>
<dependency>
<groupId>commons-dbcp</groupId>
<artifactId>commons-dbcp</artifactId>
<version>1.4</version>
</dependency>
...
</dependencies>
...
</project>
To actually integrate H2 and PHP we need to tell Jetty some additional configuration. Get these two files (web.xml and jetty-env.xml) and drop them in your src/main/webapp/WEB-INF/ directory (create this directory if it doesn't exist).
At this point, your PHP webapp is entirely configured to connect an in-memory embedded H2 database. But, there is a catch. At the point of writing this article, H2's MySQL compatibility mode is not compatible with Quercus' implementation of the PHP MySQL driver (any attempt to connect to H2 using PHP's mysql_connect() will result in an error complaining about a syntax error in query "SET NAMES ..."). To work around this, we connect to H2 using Quercus' implementation of the PHP PDO driver, which does seem to be compatible with H2's MySQL compatibility mode. So, create a file, e.g. test-database.php and put it in src/main/webapp/test-database.php:
<?php

$pdo = new PDO('mysql:');
$sth = $pdo->prepare('SELECT NOW()');
if($sth) {
$sth->execute();
if($now = $sth->fetchColumn()) {
printf('Successfully executed query on H2 at %s.', $now);
} else {
echo 'Could not execute query.';
}
} else {
echo 'Could not prepare query.';
}
Go to http://localhost:8080/test-database.php to see if it's working (which if everything went okay, it should!).

So now you should have your ultra-portable platform-independent PHP, web server and database stack up and running. Happy experimenting! :-)
What's next?
I would like to see a working version of Code Igniter using the ActiveRecord class running on this stack. Also, it would be nice to have H2's MySQL compatibility mode compatible with Quercus' MySQL driver, so we can run applications that use mysql_connect() on the stack (e.g. phpMyAdmin).
Trouble shooting
If you want to call PDOStatement::fetchObject(), you should call PDOStatement::fetchObject('stdClass') instead. This is a bug in Quercus (remember I said in the beginning that sometimes Quercus' implementation differs from PHP's). Acccording to the PHP Manual, the default first argument for PDOStatement::fetchObject should be 'stdClass', it seems the folks at Caucho forgot to implement this.

If you want to use a persistent database file instead of the temporary in-memory database, go to src/main/webapp/WEB-INF/jetty-env.xml and change line
<Set name="url">jdbc:h2:mem:;MODE=MYSQL</Set>
to
<Set name="url">jdbc:h2:filename;MODE=MYSQL</Set>
Where you replace 'filename' with a relative path to a file (relative to pom.xml) or an absolute path to a file. Note that "mem:" has an extra ":" after it and "filename" does not. For more information about the H2 JDBC URL see H2's feature list.
5 Comments

Good to know: how to properly store date and time values in MySQL

6/30/2012

6 Comments

 
MySQL has two native field types that can store information about both date and time: timestamp and datetime. The major differences between timestamp and datetime field types are:
  1. timestamp can hold values only in the range '1970-01-01 00:00:01' UTC to '2038-01-19 03:14:07' UTC while datetime can hold any value in the range '1000-01-01 00:00:00' to '9999-12-31 23:59:59'.
  2. timestamp is the only mysql field type that stores values relative to a timezone (namely UTC), datetime does not store according to a time zone!

This has some serious implications. First, timestamp can only be used where the supported value range is sufficient. Second, for scenarios where you would want to log, compare or perform other tasks with date and time, datetime is not reliable if you adhere to your server time zone settings because datetime does not store the time zone information. An example to illustrate this unreliability:

Suppose you are logging transactions of some sort to your MySQL database, neatly adding the date and time at which the transaction took place, relying on the server time zone settings. Another process is monitoring the transactions (e.g. is client X not exceeding Y transactions per hour, whether transactions result in insufficient account balance, etc.). Now suppose the time zone of the server changes, this could be because of any reason:
  1. Some countries have daylight savings time, if your server is configured to that country's particular timezone, your server automatically changes time zone upon entering and leaving daylight savings time.
  2. The server administrator manually changes the time zone, e.g. because the server moved physically, perhaps the change is by accident or he/she decided it was better to change to a time zone that doesn't have daylight savings time ;-)
  3. A bug in the system software changes the time zone by accident.

To stick with the daylight savings example, let's say the clock gets rewound one hour. Transactions are still happily being inserted into the database using datetime. Now, according to the transaction log, customers are making twice the amount of transactions during this hour. But wait?! Weren't we keeping an eye on the maximum amount of transactions per hour of clients? It looks like some clients that are operating at only half of their capacity suddenly exceed the maximum transaction limit during that hour, uh oh!

How will MySQL know whether it was 2:30 AM before or after daylight saving time when you use timestamp? The answer is: MySQL doesn't know! E.g. 28 October 2012 2:30 AM in either CEST (UTC+2:00) or CET (UTC+1:00) are both stored as unix timestamp value 1351387800 (= "2012-10-28 02:30 CET" = "2012-10-28 01:30 UTC"). As we will see soon, this is documented behaviour. It's not possible to insert unix timestamps directly into a timestamp field, so you are required to use a text representation of the date and time you are trying to store (e.g. "2012-10-28 2:30", NOW(), CURRENT_TIMESTAMP). MySQL takes this string and converts it into an unix timestamp using UNIX_TIMESTAMP(), this is where the point where 28 October 2012 2:30 AM CEST and CET both get mapped to 1351387800. One suggested work-around I came accross doesn't work in my boundary case, confirming what the manual says:

 mysql> SELECT FROM_UNIXTIME(@ts := 1351387800) = FROM_UNIXTIME(@ts - 3600);
+--------------------------------------------------------------+
| FROM_UNIXTIME(@ts := 1351387800) = FROM_UNIXTIME(@ts - 3600) |
+--------------------------------------------------------------+
| 1 |
+--------------------------------------------------------------+
1 row in set (0.00 sec)

So how can we store our dates and times without being affected by this? The answer lies in designing your database (and application). Trusting your server's time zone settings and MySQL's time zone conversion abilities is a bad idea. Instead, use datetime fields and store UTC formatted values only.  You can always get the current date and time in UTC via UTC_TIMESTAMP(), e.g.:

 mysql> SELECT UNIX_TIMESTAMP(), UTC_TIMESTAMP(), NOW();
+------------------+---------------------+---------------------+
| UNIX_TIMESTAMP() | UTC_TIMESTAMP() | NOW() |
+------------------+---------------------+---------------------+
| 1351384200 | 2012-10-28 00:30:00 | 2012-10-28 02:30:00 |
+------------------+---------------------+---------------------+
1 row in set (0.00 sec)

Alternatively, you could store unix timestamps in unsigned int columns. But then you can not reliably use all those useful documented MySQL date and time functions, and, you would have to write your own date and time calculations using math in queries which can get messy.

A disadvantage of storing all values in a datetime field is that you cannot make use anymore of the CURRENT_TIMESTAMP default value. But then again, if you need to store values outside the timestamp range or need 100% reliability, that might be one of your lesser concerns.

Conclusion
Use UTC formatted date and time values within MySQL and your application for reliability    . Store all your date and time values in UTC format in a datetime column.
6 Comments
<<Previous

    Author

    Blog about random challenges of a web developer.

    Archives

    April 2015
    May 2013
    January 2013
    July 2012
    June 2012

    Categories

    All
    Aws
    Cdn
    Code Igniter
    Css
    H2database
    Jamp
    Java
    Javascript
    Magento
    Maven
    Mysql
    Opencl
    Php
    Play-framework
    Quercus
    Scala
    Ubuntu

    RSS Feed

Powered by Create your own unique website with customizable templates.