Are you looking for a way to run Play 2 Framework on Maven with its auto-reloading functionality? You've come to the right place, read on.
I've been working with Play2 Framework for several years now and it's a very nice way to develop in Scala. Some of the Play projects have grown rather large and have become sluggish in combination with SBT. Resolving dependencies, compiling and starting Play all take a long time with SBT. Perhaps my biggest objection is that SBT can not stage a self-contained integration-test environment. These shortcomings have forced me to look at SBT alternatives. I arrived at a way to build and run Play projects with support for auto-reloading using Maven, play2-maven-plugin, sbt-compiler-maven-plugin, Eclipse, DCEVM and Zinc. This article describes how to set up such an environment for your own enjoyment.
Start by downloading the following tools:
Which version of Scala IDE, Eclipse, Zinc or Maven you install should not matter much. However, the Java and DCEVM versions do matter. It is paramount that the build versions of both Java and DCEVM (in this case 7u51) match perfectly and that you get a full version of DCEVM.
I've been working with Play2 Framework for several years now and it's a very nice way to develop in Scala. Some of the Play projects have grown rather large and have become sluggish in combination with SBT. Resolving dependencies, compiling and starting Play all take a long time with SBT. Perhaps my biggest objection is that SBT can not stage a self-contained integration-test environment. These shortcomings have forced me to look at SBT alternatives. I arrived at a way to build and run Play projects with support for auto-reloading using Maven, play2-maven-plugin, sbt-compiler-maven-plugin, Eclipse, DCEVM and Zinc. This article describes how to set up such an environment for your own enjoyment.
Start by downloading the following tools:
- Java SE Development Kit 7u51 - needs registration at Oracle (which is unfortunate but free)
- DCEVM (full) for Java 7u51 (build 3) - make sure to get the full version and not the light version
- Scala IDE for Eclipse - I used version Scala IDE 4.0.0 and Eclipse 4.4 Luna
- Zinc latest version - I used Zinc 0.3.7
- Apache Maven latest version - I used Maven 3.2.3
Which version of Scala IDE, Eclipse, Zinc or Maven you install should not matter much. However, the Java and DCEVM versions do matter. It is paramount that the build versions of both Java and DCEVM (in this case 7u51) match perfectly and that you get a full version of DCEVM.
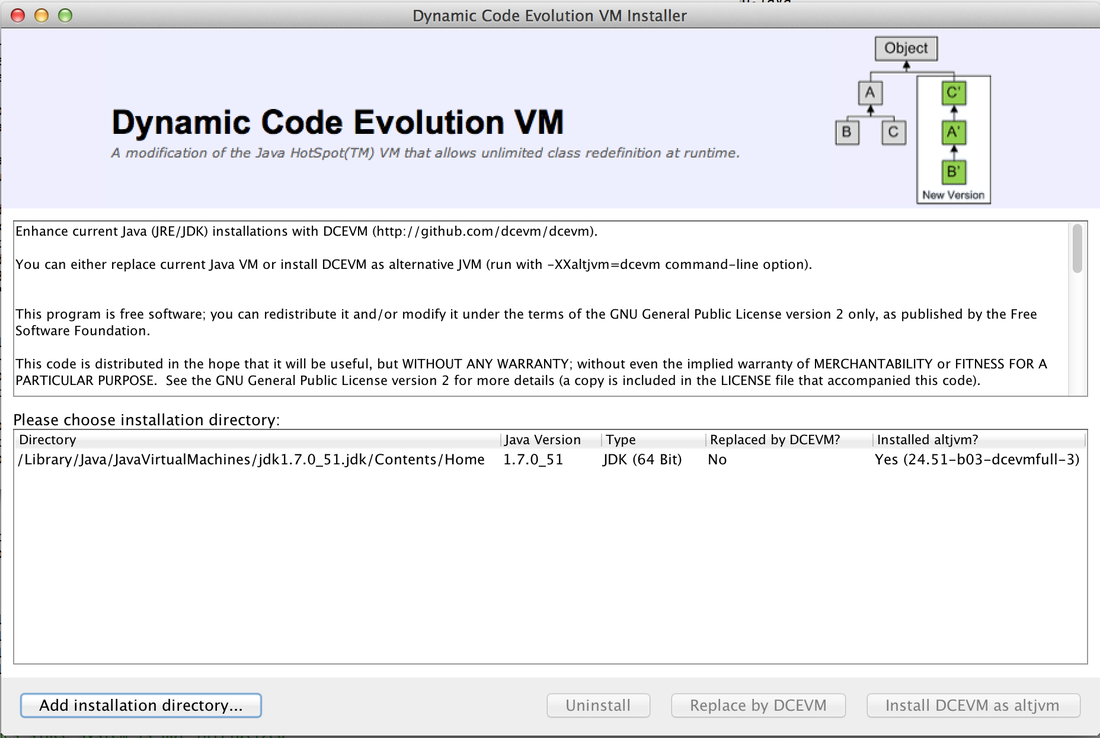
Next we are going to patch Java with DCEVM full version. Run the DCEVM installer as root after downloading it by executing the following command from a terminal:
$ sudo java -jar installer-full-jdk7u51.3.jar
This will open a GUI which asks you to specify the Java home directory for Java 7u51. If it's not already there, click the "Add installation directory..." and browse to the right Java home directory (look this up for your own operating system, this may be different). Then select the right Directory for Java version 1.7.0_51 and click "Install DCEVM as altjvm".
Apache Maven, Scala IDE and Zinc are all available to download as binaries. Download and extract the binary the respective binary archives and you should be good to go. Special note on running Maven: you have to set the JAVA_HOME environment variable. This is explained on the Maven download page (scroll down) for each operating system. The JAVA_HOME environment variable should be set to the same path you selected in the DCEVM GUI.
Make sure that Java 7u51 is your default Java version. You can verify this by running `java -version` from the command line. Also make sure DCEVM is correctly patched into the JVM as an alternative JVM, which can be verified by running `java -XXaltjvm=dcevm -version`, which should show something like:
Make sure that Java 7u51 is your default Java version. You can verify this by running `java -version` from the command line. Also make sure DCEVM is correctly patched into the JVM as an alternative JVM, which can be verified by running `java -XXaltjvm=dcevm -version`, which should show something like:
$ java -version

java version "1.7.0_51"

Java(TM) SE Runtime Environment (build 1.7.0_51-b13)

Java HotSpot(TM) 64-Bit Server VM (build 24.51-b03, mixed mode)

$ java -XXaltjvm=dcevm -version

java version "1.7.0_51"

Java(TM) SE Runtime Environment (build 1.7.0_51-b13)

Dynamic Code Evolution 64-Bit Server VM (build 24.51-b03-dcevmfull-3, mixed mode)
Start Zinc by going to the extracted Zinc directory and running:
$ ./bin/zinc -start

Nailgun server running with 0 cached compilers


Version = 0.3.7


Zinc compiler cache limit = 5

Resident scalac cache limit = 0

Analysis cache limit = 5
Start up the Scala IDE (run the file called `eclipse` in the extracted directory) and import this example Play2 Maven Hotreload project into Eclipse. Then enable the "eclipse" build profile by right-clicking on the "play2-maven-hotreload" project and go to Maven > Select Maven Profiles. Make sure only "eclipse" is checked and click OK. Right click the project again and go to Configure > Add Scala nature. The eclipse project is now set up correctly.
Note: at the time of writing the current play2-maven-plugin release does not have Dev mode support yet and as a result the static resources are cached by the browser in Prod mode. Grab this modified version of the play2-maven-plugin to build a snapshot that supports Play in Dev mode.
$ git clone https://github.com/webdevelopersdiary/play2-maven-plugin

$ cd play2-maven-plugin/plugin

$ mvn compile install
Go back to the play2-maven-hotreload directory on the command line and run:
$ mvn -P hotreload compile play2:run
Wait until you see that Play has started (in Dev mode) and then start a remote debugging session in Eclipse with the following debug configuration:

Go to http://localhost:9000 and take a look at the page. Now edit app/controllers/Application.scala or public/javascripts/hello.js and wait for Eclipse to finish compiling. The first compile attempt might take a few seconds, subsequent compile runs should be within one or two seconds thanks to Zinc. Refresh the page. If all went alright, the changes should be visible without restarting! As an added benefit, the Play server was not reloaded internally like in SBT. This gives you an extra speed boost, which is significant for large Play apps that rely on multiple database connections and cache servers, for example.
I imagine this will also work with other IDEs that have hotswapping support, like Netbrains IntelliJ IDEA, but I have not tried others so far. If you have tried, please drop your experience in the comments below. Grzegorz Slowikowski, the author of play2-maven-plugin, has brought to my attention that LinkedIn is planning to bring hot-reload support for Play 2 to Gradle. Somewhere in the future the play2-maven-plugin will support hot-reloading natively as well, until that time it will remain in beta. Simpler and more portable alternatives to SBT are on the way, stay tuned. Thanks for reading.
I imagine this will also work with other IDEs that have hotswapping support, like Netbrains IntelliJ IDEA, but I have not tried others so far. If you have tried, please drop your experience in the comments below. Grzegorz Slowikowski, the author of play2-maven-plugin, has brought to my attention that LinkedIn is planning to bring hot-reload support for Play 2 to Gradle. Somewhere in the future the play2-maven-plugin will support hot-reloading natively as well, until that time it will remain in beta. Simpler and more portable alternatives to SBT are on the way, stay tuned. Thanks for reading.
 RSS Feed
